
Repotting Pot-Bound House Plants
When roots are confined, they cannot receive enough water and fertilizer.
Pot-bound plants are nothing to be ashamed of, since they can happen to anyone, regardless of age, size, shape, or circumstance. You may find that the geranium or aloe that spent the summer on your back porch is bursting out of its container. Having been purchased from the garden center at the end of the growing season, the bargain snake plant is probably wishing to release itself from its nursery pot. House plants in small or large containers, apparently thriving, may long for more air, even if they aren’t saying so.
Identifying Pot-Bound Plants
It’s likely that the roots of a plant have become clogged with water if its soil is dry despite regular watering.
The only way you can tell that a seemingly healthy plant could use a larger container or some root pruning is by tipping its container on its side. You can tell if your pot-bound plant has white roots from the bottom drainage holes. If the soil dries out quickly, even when watered regularly, chances are the roots need pruning. Do the soil surface receive highly concentrated precipitation? Tightly wound roots might prevent water absorption.
The roots of plants in containers are forced to grow in a circular fashion, following the shape of the container rather than growing outward from the bottom and sides. This will eventually lead to the roots forming a tight mass that overwhelms the pot and the potting medium, strangling the plant. A general failure to thrive begins to develop as the situation grows worse, accompanied by leaf drop and minimal new growth.
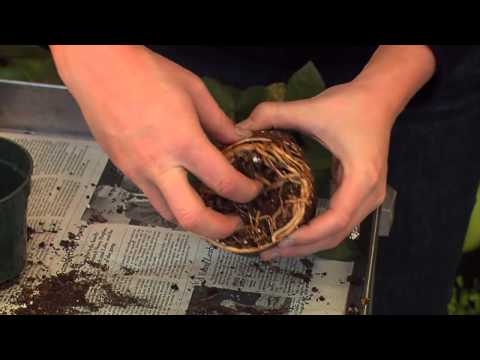
What to Do
The roots of container-bound plants have nowhere to go and are forced to grow in a circular pattern.
It is possible to remove an ill-fitting plant from its pot using several steps. Most plants are relatively easy to remove than others, however.
It may help to push up through the holes at the bottom of the pot to loosen the plant from its pot. Check the drainage hole at the bottom of the pot, and cut any roots that have managed to make their way through.
Pull the plant out of the container by carefully tipping the pot on its side, gripping the base firmly, and pulling it straight out. The rest of the plant should come out easily, although not always.
To loosen the root ball from the pot while keeping the plant in place, use a garden knife or butter knife to cut around the outside of the pot. When using plastic nursery pots, you can also firmly wack the pot on all sides, or if the roots are stuck in the pot crevices that won’t budge, you can even cut them off.
You should be able to see a dense network of white or brown roots surrounding the outside of the root ball once you have liberated it. Pot-bound plants retain the shape of the pot with these roots. Make sure you trim away any black or foul-smelling roots as soon as you see them.
Freeing Pot Bound Plants
Plants in pots should not be worried about tearing out their roots. Ultimately, the plant will be happier.
After a plant has been freed of its roots, it can begin to grow healthy again. This is when many plant lovers worry that myddling with roots is the kiss of death for their beloved plants. Roots must be freed up in this situation for the well-being of the plant. Some roots may be lost in the process, but new ones will soon sprout.
Depending on the degree of root entanglement, the exact remedy depends on your plant. With some, causing less stress, gently and slowly separating the roots may be sufficient. Whenever the root ball appears to be surrounded by more roots than soil, more severe measures might be necessary.
Make three or four vertical cuts on the outside of the root ball with a garden knife or other sharp instrument if the problem is serious, then tease the roots apart with your fingers. It is also possible to remove the bottom quarter of the root ball if the root ball is deep. Both methods disrupt root growth and allow new, healthier roots to develop.
Container Selection and Preparation
Having recovered from their root-bound state, these aloe plants were divided and upgraded.
The easiest and least stressful method of repotting a plant after it has been root-bound is to repot. This is much less labor-intensive than teasing or pruning its roots.
Make sure you choose a container at least 2 inches wider than the old pot. It should be clean, with sufficient drainage holes at the bottom. Make sure soil does not fall through the hole at the bottom of your new container. Line the bottom with a coffee filter or a piece of window screen cut to fit. Plant experts have long stated that gravel on the bottoms of containers is not necessary, though it is somewhat common.
In the bottom of the container, fill it with enough potting mix to expose the plant’s root ball to about 1 or 2 inches of the container’s rim. Fill the pot with additional potting mix, tamping down the mix as you go, and place the plant in the pot. Water thoroughly until the water drains through the drainage holes.
New, strong root growth can be stimulated by root loosening efforts provided you provide a new, larger living space for the plant. Depending on the species of houseplant, you may be able to divide your specimen when you treat a pot-bound specimen, such as a spider plant. If this is the case, follow the steps outlined above, but divide the plant into 2-3 pieces (each piece should have roots). Repot each piece into a separate container, and keep/give away the new divisions.
Aftercare
You can then repot the plants into bigger containers once their roots have been freed.
Repotted plants can sometimes show signs of transplant shock, like losing a few leaves or looking quite droopy. It’s okay to worry, but make sure not to kill the plant with kindness by overwatering. Place the plant in the proper light situation (check plant tags or ask our garden experts if you are unsure), and water when the top inch or two of the potting medium feels dry. In a short time, the new roots will start to grow and the plant will begin to bounce back.
It is beneficial for both gardeners and plants in the end to free potted plants. As with all things, practice makes perfect, but you can never go wrong with plants, and they are normally very forgiving. Plant your favorite specimens in a location where they’ll have plenty of room to flourish for years to come.