Snake plants are amazing houseplants for companionship…
They gave us lots of benefits, and in turn, we must give back to them…
One of this way of giving back is by replanting them…
Hear it from Georgia!
My snake plant hah accompanied me during this pandemic times…
I didn’t know how impactful they are until staying at home is a thing…
During my times at home, taking care of it is in my routine…
This is because I don’t want it to die and regret not taking care of it…
So one of my way of showing how to care for it is by replanting them…
Especially when it’s getting rootbound and too crowded in a pot…
Indeed!
Replanting is one way of showing your snake plant how much you love them…
Do this and your snake plant will thank you – not literally though…
Let’s dive in!
How To Grow Snake Plant (Mother-in-Law’s Tongue)

Sansevieria trifasciata is one of the most hardy houseplants available…
Most snake plants, also known as sansevieria or mother-in-law’s tongue,,,
… have slender, upright variegated leaves that grow three or four feet tall.
Sansevieria cylindrica (African spear plant) is a closely related species…
… with round rather than flat leaves and pointed tips.
This variety may have been braided at your local florist or plant nursery…
- Botanical Name: Sansevieria trifasciata
- Common Name: Snake plant, mother-in-law’s tongue
- Plant Type: Succulent, evergreen perennial
- Mature Size: 3–4 feet high
- Sun Exposure: Indirect sunlight
- Soil Type: Free-draining soil (cactus or succulent mix)
- Soil pH: 4.5–7.0
- Toxicity: Toxic
Snake Plant Care

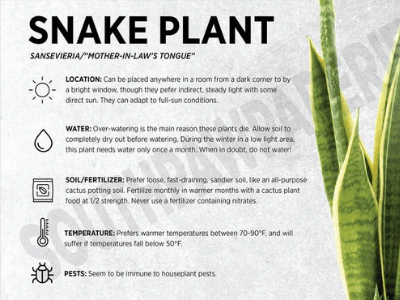
Snake plants prefer bright, indirect light, but they can also thrive…
… in low-light environments and can tolerate direct sunlight on occasion.
The amount of water your snake plant requires is proportional to the amount of light it receives…
… so keep that in mind when deciding where to put it.
Plants in brighter areas will require more frequent (but still infrequent) waterings…
… whereas plants in darker areas will require less. Every two to three months, fertilize your snake plant…
They can be repotted at any time of year…
… though they should be repotted in a larger vessel with fresh soil after three or four years.
Best Growing Conditions For Snake Plants
Snake plants can tolerate a wide range of light levels and can even withstand drought…
However, they don’t do well in cold temperatures, so keep them somewhere above 55 degrees…
Overall, these plants require very little water…
Allow them to dry out between waterings in the spring and summer…
In the winter, water only enough to keep the leaves from shriveling…
Use a terracotta or other porous material pot to avoid root rot caused by wet soil…
When watering your snake plant, be sure to do so thoroughly…
Fill a free-draining potting mix with your snake plant…
It’s best to use a soilless mix for cacti, succulents, palms, and citrus…
Cactus soil is available year-round at many hardware stores…
… but you can also find soilless potting mix at your local nursery or garden center.
Make your own by mixing equal parts sand, peat moss, and vermiculite or perlite…
When watering your snake plant, move it to a sink, bathtub, or outside so the excess water drains completely…
This prevents your plant from absorbing too much moisture from the wet soil…
Snake Plant Varieties

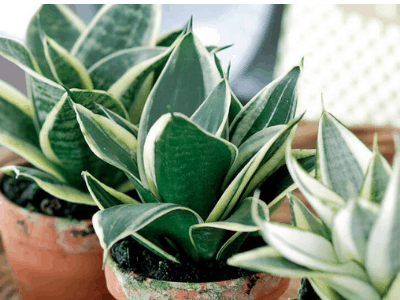
Sansevieria trifasciata ‘Laurentii’ is probably the variety that comes to mind…
… when you think of snake plants with distinctive yellow edges.
There are dwarf, solid-colored, and other varieties of Sansevieria cylindrica…
… in addition to its round-leafed cousin, Sansevieria cylindrica.
Sansevieria trifasciata, a common all-green variety native to West Africa, can reach a height of four feet…
Sansevieria gracilis, on the other hand, is a smaller snake plant that rarely grows taller than 18 inches…
Sanseveria canaliculate, on the other hand, grows in round, tall, singular spears…
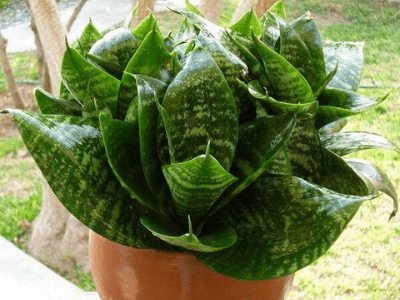
Sansevieria fischeri (small dark leaves), Sansevieria masoniana (large circular leaves)…
… and Sansevieria patens are all common varieties (short vibrant-green leaves).
How To Replant Snake Plants
Select a container with a drainage hole in the bottom…
Snake plants thrive in terra cotta pots, which allow the soil to dry out more quickly than plastic pots…
Use a potting mix that drains well.
It’s best to use a potting mix designed for “cacti and succulents,” as it’ll be less likely to become waterlogged…
Don’t bury snake plants too deeply when repotting them…
The plant should be planted at the same depth as it was in its previous container…
Repotting/Transplanting Snake Plant

Is the pot of your snake plant bulging uncomfortably?
Does the vegetation appear to be in distress?
If that’s the case, it’s time to consider how to repot a snake plant…
It isn’t a difficult job…
Depending on the age of your plant, you may be able to divide it and create a second plant at the same time!
This repotting should be done in the late winter or very early spring…
This places the transplant at a time of year when the plant is not actively growing…
It can, however, be performed at any time of year if necessary…
When roots begin to creep through the drainage holes in your pot, you’ll know it’s time…
Plastic containers may begin to bulge…
When watering, it will appear as if all of the water is passing through and none is remaining in the soil…
To support the plant, grab the base and gently turn it over…
Take a look at the bottom of the pot – do you see roots spreading out?
Does it appear that the plant is stuck, or does it slide out easily?
If it’s stuck, it’s time to get it into something a little bigger…
While the mother in law’s tongue enjoys being rootbound…
… it struggles when there are only roots left in the pot.
When it gets to that point, or if one of the other signs appears, you’ll know it’s time to get started!
If you’d like, you can propagate snake plants by division while you’re repotting…
We’ll get into more detail about that later…
Transplanting Snake Plant

If you know how to do it, repotting a snake plant is simple!
Let’s talk about how to transplant a snake plant now that you know when…
You’ll need to start by choosing a new pot…
The mother-in-tongue law’s can become quite top-heavy due to the tall leaves…
It’s important to choose a pot that’s wider than it is deep to avoid the plant’s upper weight tipping it over…
Look for a pot that is about 1-2′′ wider than the current one…
Don’t make drastic changes to the size…
Extra soil can lead to moisture pockets, which can lead to root rot…
You’ll also require extremely well-draining soil…
As this plant likes to be a bit on the dry side, pick a soil meant for tropical houseplants…
You can also add some succulent mix to a standard potting soil to improve drainage…
I prefer to use an African violet soil mix with a little sand for drainage…
A mixture of one part garden soil, one part peat moss, and two parts perlite or builder’s sand can also be used…
While a small amount of compost is beneficial, don’t overdo it…
Compost has a tendency to retain moisture, which could put the snake plant’s root ball at risk…
Here, a little goes a long way…
Remove the plant from its previous pot with care so that the root ball is not damaged…
Examine the roots once it’s free. Rot has developed if you notice dark or mushy spots on the roots…
Cut away rotten portions with a clean, sterile knife…
If there are any large roots that wrap around the entire root ball, cut them out with your knife as well…
It shouldn’t require more than one cut…
The goal is to prevent the roots from obstructing the growth of the plant…
Fill the new pot with some of your potting mix and place the plant on top of it…
Keep it planted at the same depth as it was in its old pot, but no closer than 2′′ from the rim…
To get it to the right depth, remove or add soil…
It’s not necessary to tamp the soil down too hard…
Make sure it’s deep enough to support the plant before watering it in…
If the soil sinks after watering, add more soil around the sides to raise it to the proper level…
See what I mean? It’s actually quite simple to repot a snake plant…
Post-Transplant Care
It’s critical to avoid transplant shock, especially if you had to remove rotten roots…
Transplant shock is a term that refers to a number of stresses occurring in recently transplanted trees and shrubs. It involves failure of the plant to root well, consequently the plant becomes poorly established in the landscape.
Paul C. Pecknold, Extension Plant Pathologist of Purdue University Cooperative Extension Service
For a while, you don’t want your plant to be too stressed. Snake plants are normally tolerant of full sun…
Opt for bright but indirect light for at least a month after transplant…
If you transplant in the late winter or early spring, when the sun isn’t as hot, this is less of an issue…
Summer transplants should be kept out of the sun for at least a few weeks…
For at least a month, don’t fertilize your plant…
This allows the roots to re-establish themselves in their new environment…
The last thing you want to do is burn the roots with fertilizer while they’re still tender from the move!
So give them a chance…
When the top inch of the pot has dried out, water it, but not too much…
Drain any excess standing water in a saucer that you keep under the pot…
Too much moisture is harmful to the roots because it promotes the growth of rot…
What About Division?

Snake plant division necessitates a certain amount of dexterity…
Before you can split it up, you must first figure out where the division points are…
Examine your plant, paying special attention to the areas where the leaves and stems disappear into the soil…
To make it easier to find the individual stems, take your plant out of its pot…
Grasp the base of one of those stems and wiggle it around…
You should be able to separate the roots a little with your fingers…
To loosen up the root mass and partially separate the plants, repeat the process…
Sever the plants from the mass with a Japanese garden knife or a sterilized razor blade…
You can keep two or three together in a clump, or separate each plant into its own pot…
Decide on the best-looking grouping and stick with it…
After you’ve divided your plants, repot them in separate pots using the steps outlined above…
Choose a pot that is 1-2 inches wider than the root cluster of your divided plant…
To sum it up…
It’s really that simple to repot a snake plant!
What’s more, it only needs to be done every two to three years…
You’ll be happy, and your snake plant will be happy…
You might even get some new plants!
Conclusion
If you still have any queries on the matter…
… don’t hesitate to ask us any questions…
… through the comment section below…
… or the contact us column.
Check out more of our posts like this one here!
I hope you can now take care your snake carefully and grow it big!
Thanks for reading this article! Bye!


